返回

专栏第六篇-虚拟节点以及createElement函数

在前面的文章中,我们介绍了Vue初始化的一系列操作。

可以Vue终归只是为了画页面。

后面的章节就带着大家来解析渲染相关的逻辑,一步一步解析Vue是如何将模板挂载到页面上的。

但是在解析渲染之前,我们先来了解一下Vue框架渲染的基础-虚拟 DOM。

一、渲染器的渲染流程

在讨论虚拟节点之前,我们先来了解一下浏览器渲染的流程。

当浏览器接收到一个 HTML 文件后,JavaScript 引擎与浏览器的渲染引擎随即开始运行。

从渲染引擎的角度来看,它首先会把 HTML 文件解析为一个 DOM 树。

与此同时,浏览器会识别并加载 CSS 样式,然后将其与 DOM 树合并,形成一个渲染树。

在有了渲染树之后,渲染引擎会计算所有元素的位置信息,最后通过绘制操作,在屏幕上呈现出最终的内容。

JavaScript 引擎和渲染引擎虽然处于两个独立的线程之中,然而 JavaScript 引擎却能够触发渲染引擎开始工作。

当我们借助脚本去更改元素的位置或者外观时,JavaScript 引擎会运用与 DOM 相关的 API 方法来操作 DOM 对象。

此时渲染引擎便开始运作,渲染引擎会触发回流或者重绘操作。

我们来了解下回流以及重绘的概念:

  • 回流:当我们对DOM的修改引发了元素尺寸的变化时,浏览器需要重新计算元素的大小和位置,最后将重新计算的结果绘制出来,这个过程称为回流。

  • 重绘:当我们对DOM的修改只单纯改变元素的颜色时,浏览器此时并不需要重新计算元素的大小和位置,而只要重新绘制新样式。这个过程称为重绘。

很显然,回流比起重绘更加消耗性能。

通过了解浏览器基本的渲染机制,我们不难联想到,当不断地通过 JavaScript 修改 DOM 时,很容易在不经意间触发渲染引擎的回流或者重绘,而这种操作所带来的性能开销是非常巨大的。

因此,为了降低性能开销,我们需要做的是尽可能地减少对 DOM 的操作。

虚拟节点就是在这种情况下孕育而生。

二. 缓冲层-虚拟DOM

虚拟 DOM (Virtual DOM 以下简称 VDOM)是为了解决频繁操作 DOM 所引发的性能问题而产生的产物。

VDOM是把页面的状态抽象成 JS 对象的形式呈现。

从本质上来说,它处于 JS 与真实 DOM 之间,起着中间层的作用。

当我们需要使用 JS 脚本进行大批量的 DOM 操作时,会优先在虚拟 VDOM 这个 JS 对象上进行操作。

最后,通过对比找出将要改动的部分,并将这些改动通知并更新到真实的 DOM 上。

尽管最终仍然是对真实的 DOM 进行操作,然而虚拟 DOM 能够将多个改动合并为一个批量操作。

这样做可以减少 DOM 重排的次数,进而缩短生成渲染树以及进行绘制所花费的时间。

我们来看一下一个真实的 DOM 具体包含了哪些内容。

浏览器将真实的 DOM 设计得极为复杂。

它不但包含了自身的属性描述,如大小、位置等定义,还囊括了 DOM 所拥有的浏览器事件等内容。

正是由于其如此复杂的结构,我们频繁地去操作 DOM 或多或少会给浏览器带来性能方面的问题。

而作为数据与真实 DOM 之间的一层缓冲,虚拟 DOM 只是用于映射到真实 DOM 进行渲染,所以并不需要包含操作 DOM 的方法。

它只需在对象中重点关注几个属性就可以了。

三、 VNode

1
2
3
4
5
6
7
8
9
10
11
12
13
14
15
16
17
18
19
// 真实DOM
<div id="app"><span>Hello World</span></div>

// 真实DOM对应的JS对象(VNode)
{
tag:'div',
data:{
id:'app'
},
children:[{
tag:'span',
children:[
{
tag:undefined,
text:'Hello World'
}
]
}]
}

通过上面的例子我们可以看出来每一个 DOM节点 都可以使用一个 VNode 来表示

在 Vue内部,使用 VNode 这个构造函数去描述一个节点。

1
2
3
4
5
6
7
8
9
10
11
12
13
14
15
16
17
18
19
20
21
22
23
24
25
26
27
28
29
30
31
32
33
34
35
36
37
38
39
40
41
42
43
44
45
46
47
48
49
50
51
52
53
54
55
56
57
58
59
60
61
62
63
64
65
66
67
68
69
70
71
export default class VNode {
tag?: string
data: VNodeData | undefined
children?: Array<VNode> | null
text?: string
elm: Node | undefined
ns?: string
context?: Component // rendered in this component's scope
key: string | number | undefined
componentOptions?: VNodeComponentOptions
componentInstance?: Component // component instance
parent: VNode | undefined | null // component placeholder node

// strictly internal
raw: boolean // contains raw HTML? (server only)
isStatic: boolean // hoisted static node
isRootInsert: boolean // necessary for enter transition check
isComment: boolean // empty comment placeholder?
isCloned: boolean // is a cloned node?
isOnce: boolean // is a v-once node?
asyncFactory?: Function // async component factory function
asyncMeta: Object | void
isAsyncPlaceholder: boolean
ssrContext?: Object | void
fnContext: Component | void // real context vm for functional nodes
fnOptions?: ComponentOptions | null // for SSR caching
devtoolsMeta?: Object | null // used to store functional render context for devtools
fnScopeId?: string | null // functional scope id support
isComponentRootElement?: boolean | null // for SSR directives

constructor(
tag?: string,
data?: VNodeData,
children?: Array<VNode> | null,
text?: string,
elm?: Node,
context?: Component,
componentOptions?: VNodeComponentOptions,
asyncFactory?: Function
) {
this.tag = tag
this.data = data
this.children = children
this.text = text
this.elm = elm
this.ns = undefined
this.context = context
this.fnContext = undefined
this.fnOptions = undefined
this.fnScopeId = undefined
this.key = data && data.key
this.componentOptions = componentOptions
this.componentInstance = undefined
this.parent = undefined
this.raw = false
this.isStatic = false
this.isRootInsert = true
this.isComment = false
this.isCloned = false
this.isOnce = false
this.asyncFactory = asyncFactory
this.asyncMeta = undefined
this.isAsyncPlaceholder = false
}

// DEPRECATED: alias for componentInstance for backwards compat.
/* istanbul ignore next */
get child(): Component | void {
return this.componentInstance
}
}

我们可以使用 new 关键字来创建一个 VNode。

1
2
3
4
5
6
7
8
// 创建一个div的 vnode
new VNode('div',{},'Hello World')
// 创建一个有子节点的 vnode
new VNode('div',{},[
new VNode('span',{},'1'),
new VNode('span',{},'2'),
new VNode('span',{},'3')
])

VNode这个构造函数上有非常多的属性,这里我们先列举四个常用的属性:tag、data、children、text

其余属性在我们后面的解析中会一一进行解析。

3.1 tag属性

tag表示创建的虚拟节点的标签名称。

决定了最终会渲染成什么样的 DOM元素。

tag可以是 HTML 元素,比如字符串span、'div'

也可以是一个组件引用,同样可以是一个动态标签。

1
2
3
4
5
6
7
8
9
10
11
12
// 编译前(普通节点)
<div></div>
// 编译后
VNode {
tag:"div"
}
// 编译前(组件节点)
<CustomComponent></CustomComponent>
// 编译后
VNode {
tag:"CustomComponent"
}

3.2 data属性

data 参数通常是一个对象,包含了用于描述 VNode 的各种属性和配置信息。

data 参数可以由以下几种构成:

  • attrs:表示元素的上静态属性,如src、alt等。
  • staicClass:表示元素上的静态css类。
  • style:表示元素上的内联样式。
  • on:表示元素上的事件监听器。
  • slot:表示作用域插槽或普通插槽的位置。
  • props:表示传递组件的 props 数据。
  • directives:表示添加的自定义的行为,如 v-model、v-show等。
  • key:表示组件唯一标识。

3.3 children

children 参数是指定一个 VNode(虚拟节点)的子节点内容。

这个参数可以包含多种类型的数据,用于描述子节点的结构和内容。

3.4 text

我们知道并不是每个节点都有tag的,比如文字节点就没有tag。

在Vue中,文字也代表一个vnode。

1
2
3
4
5
6
// 编译前
"我是"
// 编译后
VNode {
text:"我是"
}

3.1.5 elm

我们知道在渲染时会根据 VNode 创建DOM元素。

渲染后每个VNode节点都有对应的真实 DOM元素。

而这个 elm 就指向这个真实 DOM元素。

四. createElement函数

经过上面的学习,我们知道虚拟DOM就是一个JS对象,只不过他有很多属性。

所示说创建一个虚拟DOM也绝不是什么难事,但是 Vue 框架给我们提供了一个函数createElement。

这个函数可以更方便的帮我们生成虚拟 DOM,在其中磨平了一些细节。

它被定义在 src/core/vdom/create-element.js 中:

4.1 createElement在开发时的使用场景

了解createElement的使用场景有哪些对看源码是有一定的帮助的。

有场景带入源码才知道对应的逻辑是在做什么,否则你光看源码,对于一些逻辑你是无法看懂的。

4.1.1 webpack编译时使用

Vue框架底层渲染时会调用实例上的_render方法,这个 render方法实际上就是调用了实例选项上的 render方法。

1
vm._render => vm.$options.render

你可能会有些困惑,因为平时我们都是使用.vue文件进行单页面开发,没有写过什么 render方法啊,那这个 render方法是怎么来的呢?

其实我们平时编写的 template模板标签在 webpack预编译阶段会变成一个创建vnode的函数。

比如我们在模版中编写一个简单的字符串:

1
2
3
<template>
<div>hello world</div>
</template>
.vue文件在webpack预编译时会解析成一个对象,而模板部分则会编译成 render函数。

所以平时我们import Test from "./Test",这里的Test打印出来是一个对象。

我们再看一下这里编译的 render方法,发现没有使用 createElement函数来创建节点,而使用了_c。

那么这里的_c代表什么?

_c实际上是在 vue初始化时在initRender方法中注入的,本质上也就是调用了 createElement。

1
2
// 第六个参数代表是否需要规范化子节点 这里表示不需要 因为 webpack 预编译时会编译子节点
vm._c = (a, b, c, d) => createElement(vm, a, b, c, d, false)

4.1.2 用户自定义render方法

我们知道.vue文件会被解析成一个对象的形式。

所以我们也可以自己写一个 js文件,自己定义 render方法。Vue提供了这种能力。

我们一般会这么自定义函数。

1
2
3
4
5
6
7
{
render:(h)=>{
return {
h('div','hello world')
}
}
}

而源码中会将 vm.$createElement传入 render方法中。

1
2
3
4
5
try { 
vnode = render.call(vm._renderProxy, vm.$createElement)
} catch (e: any) {
///
}

所以这里的 vm.$createElement就是h函数,也就是创建 VNode的函数。

$createElement和_c一样也是在vue初始化时在initRender方法中注入的。

1
2
// 第六个参数是 true 表示需要处理子节点为 VNode节点
vm.$createElement = (a, b, c, d) => createElement(vm, a, b, c, d, true)

_c和$createElement的不同之处是$createElement中对于 createElement的第六个参数传递的值不同。

4.2 createElement函数解析

1
2
3
4
5
6
7
8
9
10
11
12
13
14
15
16
17
18
export function createElement(
context: Component,
tag: any,
data: any,
children: any,
normalizationType: any,
alwaysNormalize: boolean
): VNode | Array<VNode> {
if (isArray(data) || isPrimitive(data)) {
normalizationType = children
children = data
data = undefined
}
if (isTrue(alwaysNormalize)) {
normalizationType = ALWAYS_NORMALIZE
}
return _createElement(context, tag, data, children, normalizationType)
}

createElement的参数分别是:

  1. 第一个参数为context:表示上下文,一般这里传递的是vue实例vm。
  2. 第二个参数为 tag:表示创建的虚拟节点的标签。
  3. 第三个参数为 data:表示创建的虚拟节点的数据。
  4. 第四个参数为 children:表示虚拟节点的子节点。
  5. 第五个参数为 normalizationType:这个参数决定规范化的类型。
  6. 第六个参数为 alwaysNormalize:表示是否规范化子节点。

createElement 方法实际上是对 _createElement 方法的封装,它允许传入的参数更加灵活,在处理这些参数后,调用真正创建 VNode 的函数 _createElement

4.2.1 对第二个参数做兼容

1
2
3
4
// 存在 data的情况
createElement(context,'div',{style:{color:"red"}},'hello world')
// 不存在 data的情况
createElement(context,'div',null,'hello world')

如上,第三个参数表示 data,第四个参数表示children。

而很多时候,我们不需要传递 data属性,但是由于参数顺序的原因,依旧需要传递一个空对象来进行占位。

这个时候函数内部对这个参数进行了兼容处理。

判断如果第三个参数是数组或者原始类型(字符串,数字等),则将其第三个参数视为是传递的子节点。

同时将data置为undefined,normalizationType使用第四个参数。

因此我们可以这么调用,不用再使用一个占位符了。

1
2
// 不存在 data的情况 不需要传递 data进行占位
createElement(context,'div','hello world')

4.2.2 对children的规范化

由于VNode实际上是一个树状结构,每一个VNode可能会有若干个子节点,这些子节点应该也是 VNode 的类型。

_createElement 接收的第 4 个参数 children 是任意类型的,因此我们需要把它们规范成 VNode 类型。

normalizationType的值有 2 种:

  1. SIMPLE_NORMALIZE:值为 1,表示简单处理子节点
  2. ALWAYS_NORMALIZE:值为 2,表示递归处理所有子节点

需要注意的是对于用户手动创建render方法,normalizationType一直为ALWAYS_NORMALIZE。表示需要规范处理子节点。

因为用户有可能不是很熟悉 createElement的使用方式和 Vue的渲染机制导致一些错误情况的发生,如下:

1
2
3
4
5
6
7
8
// 如果不进行处理,在渲染过程中极有可能会产生问题
render(h){
return h('ul',[
"苹果",
"香蕉",
"梨"
])
}

这里根据 normalizationType 的不同,分别调用了normalizeChildren(children)simpleNormalizeChildren(children)方法。

它们的定义都在 src/core/vdom/helpers/normalzie-children.js 中:

4.2.2.1 simpleNormalizeChildren

1
2
3
4
5
6
7
8
9
10
11
12
13
14
15
16
17
18
19
20
// The template compiler attempts to minimize the need for normalization by
// statically analyzing the template at compile time.
//
// For plain HTML markup, normalization can be completely skipped because the
// generated render function is guaranteed to return Array<VNode>. There are
// two cases where extra normalization is needed:

// 1. When the children contains components - because a functional component
// may return an Array instead of a single root. In this case, just a simple
// normalization is needed - if any child is an Array, we flatten the whole
// thing with Array.prototype.concat. It is guaranteed to be only 1-level deep
// because functional components already normalize their own children.
export function simpleNormalizeChildren(children: any) {
for (let i = 0; i < children.length; i++) {
if (isArray(children[i])) {
return Array.prototype.concat.apply([], children)
}
}
return children
}

当 normalizationType 为 SIMPLE_NORMALIZE 时,才会调用simpleNormalizeChildren方法。

那么 normalizationType 何时才会是 SIMPLE_NORMALIZE呢?

我们知道用户自定义 render函数的时候,normalizationType恒为ALWAYS_NORMALIZE,所以只有是在编译的时候在_c中才会将值变成 SIMPLE_NORMALIZE。

理论上编译生成的children都已经是 VNode类型了,不需要处理了才对。

但是有一种情况需要考虑,就是函数组件返回的是一个数组而不是一个根节点,

1
2
3
4
5
6
7
export default {
functional: true,
props: ['items'],
render(h, { props }) {
return props.items.map(item => h('li', item));
}
};

此时需要将数组打平成一级。

4.2.2.2 normalizeChildren递归处理子节点

1
2
3
4
5
6
7
export function normalizeChildren(children: any): Array<VNode> | undefined {
return isPrimitive(children)
? [createTextVNode(children)]
: isArray(children)
? normalizeArrayChildren(children)
: undefined
}

normalizeChildren用在用户自定义render时对 children进行规范化,因为编译时已经将 children 都规范化为了createElement创建函数。

  1. Vue允许用户把children写成基础类型用来创建单个简单的文本节点,对应这种场景,vue会调用 createTextVNode创建一个文本节点的 VNode,并且会转化成数组的形式。
1
2
3
4
5
6
7
8
9
10
11
12
13
14
15
16
17
// 用户自定义 render函数
export default {
render:function(h){
return h('div','Hello World')
}
}
// 生成的 VNode
VNode {
tag:'div',
// 将文字转化成了children数组
children:[
VNode {
tag: undefined,
text: 'Hello World'
}
]
}
  1. 如果 children是一个数组,需要递归处理 children,遍历每一个子节点,将每一个子节点转化为标准的 VNode,其中这个转化操作是使用normalizeArrayChildren函数来完成的。
1
2
3
4
5
6
7
8
9
10
11
12
13
14
15
16
17
18
19
20
21
22
23
24
25
26
27
28
29
30
31
32
33
34
35
36
37
38
39
40
41
42
43
44
45
46
47
48
49
50
51
52
function normalizeArrayChildren(
children: any,
nestedIndex?: string
): Array<VNode> {
const res: VNode[] = []
let i, c, lastIndex, last
for (i = 0; i < children.length; i++) {
c = children[i]
if (isUndef(c) || typeof c === 'boolean') continue
lastIndex = res.length - 1
last = res[lastIndex]
// nested
if (isArray(c)) {
if (c.length > 0) {
c = normalizeArrayChildren(c, `${nestedIndex || ''}_${i}`)
// merge adjacent text nodes
if (isTextNode(c[0]) && isTextNode(last)) {
res[lastIndex] = createTextVNode(last.text + c[0].text)
c.shift()
}
res.push.apply(res, c)
}
} else if (isPrimitive(c)) {
if (isTextNode(last)) {
// merge adjacent text nodes
// this is necessary for SSR hydration because text nodes are
// essentially merged when rendered to HTML strings
res[lastIndex] = createTextVNode(last.text + c)
} else if (c !== '') {
// convert primitive to vnode
res.push(createTextVNode(c))
}
} else {
if (isTextNode(c) && isTextNode(last)) {
// merge adjacent text nodes
res[lastIndex] = createTextVNode(last.text + c.text)
} else {
// default key for nested array children (likely generated by v-for)
if (
isTrue(children._isVList) &&
isDef(c.tag) &&
isUndef(c.key) &&
isDef(nestedIndex)
) {
c.key = `__vlist${nestedIndex}_${i}__`
}
res.push(c)
}
}
}
return res
}

该函数的主要逻辑就是遍历children数组,获取每一项的数据类型,然后做相应处理。

  1. 如果是未定义/null/布尔值,直接跳过,不进行处理。
  2. 如果是数组类型,则递归调用normalizeArrayChildren。
  3. 如果是基础类型,则通过 createTextVNode方法转换成 VNode类型。
  4. 如果不是上面三种类型,则表示已经是 VNode类型了。

需要注意的是在遍历的过程中,对这 3 种情况都做了如下处理:如果存在两个连续的 text 节点,会把它们合并成一个 text 节点

4.2.2.3 总结

经过对 children的统一处理,现在 VNode已经是一个规范化的 VNode节点了。

4.3 VNode的创建

经过兼容处理和 children规范化处理后,就可以创建VNode了。

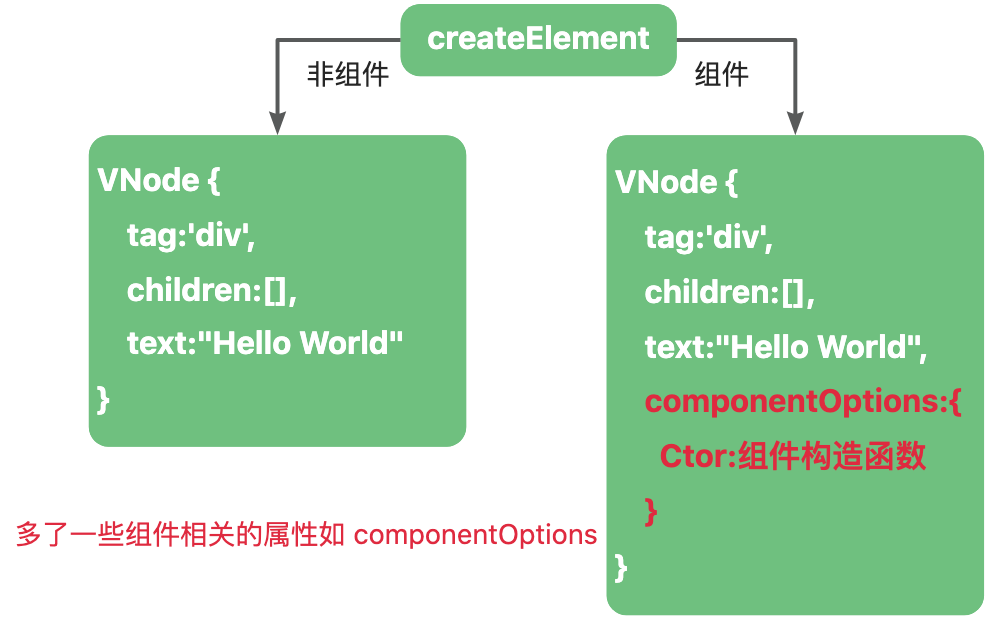
4.3.1 非组件 VNode

当 tag为字符串,且不是注册组件,则直接调用 VNode来创建 VNode。

tag是字符串一般有 2 种情况:

  1. 普通的HTML标签
1
2
3
4
5
6
7
// 模板编译前
<template>
<div>Hello World</div>
</template>
// 模板编译后
// _v表示createTextVNode 用作创建子节点
_c('div',[_v('Hello World')])
  1. 组件类型
1
2
3
4
5
6
7
// 模板编译前
<template>
<Component />
</template>
// 模板编译后
// _v表示createTextVNode 用作创建子节点
_c('Component')

4.3.2 组件 VNode

当 tag不是字符串或者字符串是注册组件的关键字,则表示需要创建一个组件VNode。此时调用 createComponent来创建组件VNode。

1
2
3
4
5
6
7
8
9
10
11
12
13
14
15
16
17
18
19
20
21
22
23
24
25
26
27
28
29
30
31
32
33
34
35
36
37
38
39
40
41
42
43
44
45
46
47
48
49
50
51
52
53
54
55
56
57
58
59
60
61
62
63
64
65
66
67
68
69
70
71
72
73
74
75
76
77
78
79
80
81
82
83
84
85
86
87
88
89
90
91
92
93
94
95
96
97
98
99
100
101
102
103
104
105
106
107
108
109
110
export function createComponent(
Ctor: typeof Component | Function | ComponentOptions | void,
data: VNodeData | undefined,
context: Component,
children?: Array<VNode>,
tag?: string
): VNode | Array<VNode> | void {
if (isUndef(Ctor)) {
return
}

const baseCtor = context.$options._base

// plain options object: turn it into a constructor
if (isObject(Ctor)) {
Ctor = baseCtor.extend(Ctor as typeof Component)
}

// if at this stage it's not a constructor or an async component factory,
// reject.
if (typeof Ctor !== 'function') {
if (__DEV__) {
warn(`Invalid Component definition: ${String(Ctor)}`, context)
}
return
}

// async component
let asyncFactory
// @ts-expect-error
if (isUndef(Ctor.cid)) {
asyncFactory = Ctor
Ctor = resolveAsyncComponent(asyncFactory, baseCtor)
if (Ctor === undefined) {
// return a placeholder node for async component, which is rendered
// as a comment node but preserves all the raw information for the node.
// the information will be used for async server-rendering and hydration.
return createAsyncPlaceholder(asyncFactory, data, context, children, tag)
}
}

data = data || {}

// resolve constructor options in case global mixins are applied after
// component constructor creation
resolveConstructorOptions(Ctor as typeof Component)

// transform component v-model data into props & events
if (isDef(data.model)) {
// @ts-expect-error
transformModel(Ctor.options, data)
}

// extract props
// @ts-expect-error
const propsData = extractPropsFromVNodeData(data, Ctor, tag)

// functional component
// @ts-expect-error
if (isTrue(Ctor.options.functional)) {
return createFunctionalComponent(
Ctor as typeof Component,
propsData,
data,
context,
children
)
}

// extract listeners, since these needs to be treated as
// child component listeners instead of DOM listeners
const listeners = data.on
// replace with listeners with .native modifier
// so it gets processed during parent component patch.
data.on = data.nativeOn

// @ts-expect-error
if (isTrue(Ctor.options.abstract)) {
// abstract components do not keep anything
// other than props & listeners & slot

// work around flow
const slot = data.slot
data = {}
if (slot) {
data.slot = slot
}
}

// install component management hooks onto the placeholder node
installComponentHooks(data)

// return a placeholder vnode
// @ts-expect-error
const name = getComponentName(Ctor.options) || tag
const vnode = new VNode(
// @ts-expect-error
`vue-component-${Ctor.cid}${name ? `-${name}` : ''}`,
data,
undefined,
undefined,
undefined,
context,
// @ts-expect-error
{ Ctor, propsData, listeners, tag, children },
asyncFactory
)

return vnode
}

创建组件 VNode时,会在 VNode新增一些组件特有的属性:

  1. 使用 Vue.extend生成一个子类构造器,会挂载到 VNode的componentsOptions属性的 Ctor上。
  2. 处理异步组件
  3. 处理 model
  4. 注入一些 hooks 等

4.4 createElement函数的优势

createElement函数的意义在于它提供了一种更方便、更简洁且更具可读性的方式来创建vnode,相比直接编写 VNode 具有以下好处:

4.4.1 直观的参数形式

使用createElement函数可以通过直观的参数来描述虚拟节点的属性。

相比之下,直接编写 VNode 对象时,需要手动构建一个包含多个属性的 JavaScript 对象,可能会导致代码较为冗长和复杂,降低了可读性和可维护性。

4.4.2 统一的创建方式

在项目中使用createElement函数可以确保虚拟节点的创建方式一致。

直接编写 VNode 对象可能会导致不同的开发者采用不同的方式来构建虚拟节点,从而降低了代码的一致性和可维护性。

4.4.3 动态属性和条件判断

createElement函数可以接收动态的参数,允许在运行时根据条件来决定虚拟节点的属性。例如,可以根据数据的变化动态地添加或修改属性,或者根据条件判断来决定是否创建某个子节点。

直接编写 VNode 对象时,要实现类似的动态行为可能需要更多的代码和逻辑处理,增加了代码的复杂性。

五、总结

为了避免重复操作真实 DOM 所带来的性能消耗,vue框架引入了虚拟 DOM。

虚拟 DOM本质上就是一个具有特有属性的一个 JS对象。

为了实现创建虚拟 DOM 的一致性,vue提供了一个方法 createElement 用来方便快捷的生成虚拟 DOM。


本站总访问量